skip to main |
skip to sidebar
Appliances as gifts for me are usually a major faux pas but this year I did ask hubby for one because I felt it would truly enhance our life.
Hubby spent months researching our needs and checking for sales, which resulted in gifting me with this little beauty.
Quick note: This post is self-generated from happiness over may Christmas gift. I am neither affiliated with the company that produced this product nor receiving any remuneration for it.
We are trying to eliminate as many contaminants from our living space as possible without compromising cleanliness levels. We have a dog and two cats. We weren't only concerned with the dander they produce but worried about them licking their paws and ingesting chemicals from the cleaners on the market. We weren't comfortable with the off-gassing of those products, either.
My Shark Steam Blaster uses water not cleaning fluids. After cleaning with it, our home now smells like fresh, line-dried linen and our surfaces are sterilized by the steam.
Besides eliminating chemicals, we wanted to eliminate waste. We just pop the cloth cleaning pad in the washer.
Here are its attributes, according to Canadian Tire's listing for it:
- Equipped with steam pocket technology, the steam blaster provides 30 minutes of cleaning time on a single tank of water.
- Turns ordinary tap water into a powerful household cleanser.
- Cleans, sanitizes and deodorizes appliances, countertops, bathrooms, tiles, mirrors and more without harsh chemicals.
- Steam ready in 5 minutes.
- Large wheels for easy mobility.
And, due to my hubby's research and patience, he snagged this at a pre-Christmas sale for $65.99, plus taxes. Major scoop, since it is now listed for $169.99!
My daughter made me a fantastic pair of felted slippers for Christmas 2009. I loved them...apparently my dogs did, too. Although neither pooch is the brightest bulb on the Christmas tree, they seemed to master the following, simple math equation:
+
=

Materials:
- slippers
- leather
- felt
- black, waxed, carpet thread (Substitution: thick, waxed, dental floss)
Tools:
- white pencil or dressmaking chalk
- sharp, heavy duty scissors
- Karen Foster 'Clikit' (a punching/embossing/eyelet setting tool)
- 4 mm. punching tip
- carpet needle
Step 1: Place the slippers on the sueded side of the leather.
Step 2: Trace the slipper shape onto the leather with a white pencil.
Step 3: Cut out the slipper shape.
Step 4: Load your Clikit tool with the 4 mm. punch tip and punch holes along the perimeter of each leather slipper shape. Try and keep the holes at regular intervals and avoid getting too close to the edge of the leather.
Step 5: Use the slipper shapes to cut two felt thicknesses for each foot. There's no need to create punch holes in the felt.
Step 6: Stack your materials in the following order: felted slipper, two pieces of the felt shapes, and on piece of the punched leather shape. Make sure the suede side of the leather faces inward. You can clamp these together with some clothes pins, if you like.
Step 7: Sew your slipper forms onto your slipper through the holes punched in the leather, using a running stitch. The best tool for this kind of sewing is carpet needle threaded with black, waxed, carpet thread or thick, waxed dental floss. The carpet needle is sharp enough to pierce through the felted slipper and two pieces of felt shapes. The black, waxed, carpet thread will slide through the material easily, plus it is strong enough to withstand frequent wear.
The carpet needle is the middle one in the picture below. The tip is sharp but flattened, similar to the blade of a double-edged knife.
Step 8: Trim any excess felt material, if it shifted during sewing.
Looks like my toes will be toasty-warm for at least the rest of the winter.
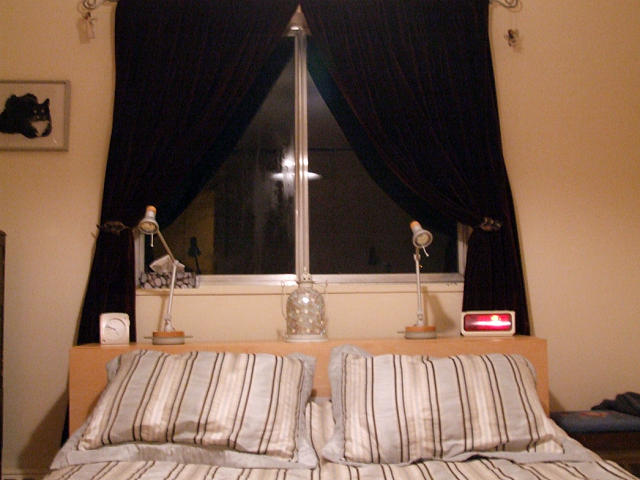
Hubby and I live in an apartment in Canada. Our master bedroom is on the corner of the building and we've lived with the draft assaulting our heads in that room for six years.
Until the second Iron Craft challenge, I didn't really stretch my brain cells on what to do about it; I only focused on what I couldn't do. The bedroom has sliding windows, so a padded, window snake wouldn't meet our needs. The challenge gave me a chance to think outside the box. Besides banishing the draftiness, I wanted something that would afford more privacy without sacrificing natural light during the day.
Here is the solution, which required some help from my hubby. We're so pleased with it that we've even given it a name, 'Room with a View'.
Before:
Now that you've seen the 'before' picture, I'm sure the question that begs to be asked is, "Why didn't we just move the bed to another wall?" Well, in order to fit all our bedroom furniture, while leaving plenty of room for egress, there was only one possible place to put it...right in front of that dratted window.
My hubby already had one of his photographs printed up on translucent plastic. I measured the inside width of the window, got him to make a frame from some old pieces of baseboard, I painted it, and then we attached the print to the back of the frame.
It fits easily into the window framing and the space at the top allows any winter condensation to dry.
The translucence of the plastic allows natural light to enter the room during the day. Here is a picture of the frame, back lit, so you can see how much light will filter through.
Translucency:
Now for the reveal; hope you like it!
After:
Now I just have to wheedle hubby into making some kind of shelving above it.
 I was browsing online and came across a fellow crafter's blog Backstitch Baby with a tutorial on how to make some easy, fire starters for fireplaces, wood stoves or camping.
Years ago, I made and sold these to a local hardware store. They really work. I packaged them in brown paper, lunch bags with the above graphic printed on them.
My technique was a little different. I used old muffin tins as uniform bases, filled them to one-third with Parowax, dipped the pine cones in wax to lightly coat them, and used candle wicking.
It's my hubby's birthday today. Birthdays close to the holidays sometimes don't get the proper attention paid to them so, to ensure the day is special, I acquired the cake ingredients in November so he could have a unique cake to enjoy.
Also, I'd like to share the recipe so perhaps you may enjoy it, too. I can't attribute the recipe to anyone because I acquired it many years ago and it was written on a recipe card by me.
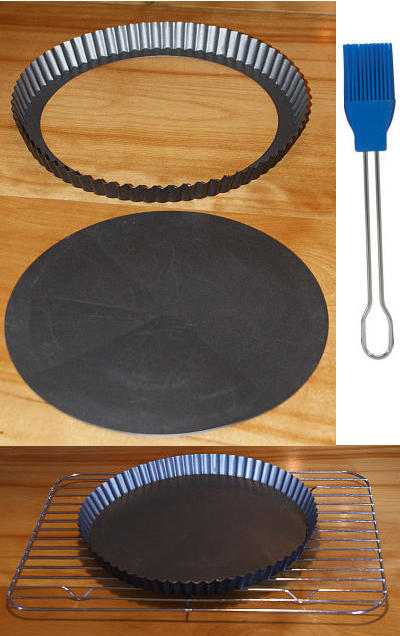
Chocolate Apricot Flan

Preheat oven to 375°F
Cooking time: 20-25 minutes
Special tools needed:
- flan tin
- cake rack
- basting brush

Prepare your flan tin by rubbing it with butter, swish some flour around the pan until the butter is covered. Shake off the excess flour and set aside.
Melt together:
- 3 squares of unsweetened chocolate
- 1/2 cup butter
Once the melted mixture has cooled, transfer it into a mixer and then add the following, mixing on low after each ingredient addition:
- 2 eggs
Mix in on low.
- 1/2 cup milk
Mix in on low.
- 1 tablespoon of Grand Marnier
Mix in on low.
- 1 teaspoon of pure vanilla
Mix in on low.
- 2 teaspoons of baking powder
Mix in on low.
- 3/4 cup of sugar
Mix in on low.
- 3/4 cup of flour
Mix in on low.
When finished, your batter should resemble chocolate mousse. Pour into your prepared flan tin and bake for 20 to 25 minutes. You can check done-ness by touching the top, middle of the flan. If it springs back after you touch it, it is done.
Remove from the oven and place the flan tin on a baking rack to ensure the flan cools evenly.
Once cooled, place a plate over the top of the tin and flip it over. Remove the collar and then the flan disk.
Brush 2 tablespoons of Grand Marnier on the top of your flan.
Then arrange on top of the flan:
- 1 can of drained, apricot halves
Heat together to make a glaze:
- 2 tablespoons of Grand Marnier
- 2 tablespoons of apricot jam
Brush the glaze on top of the apricot halves.
Sprinkle some almond slices on top, if you desire.
C'est fini...enjoy!
 Iron Craft is holding a year-long, craft challenge.
One of my New Year's resolutions is to more actively explore my creativity so I decided to join this crafting challenge. This might actually force me to follow through on my resolution.
If you would like to find out the details on how to join this challenge, go to Iron Craft's page Are you ready for the year of crafty?
This week's challenge for January 9th is called Lighting the Winter Gloom.
Here's my entry for Challenge #1: I pierced a copper sheet with a recurring apple pattern, framed it, and used it to cover a really ugly, fluorescent light above my sink.